Blog

Geo IP lookup – ipinfodb.com API integration using PHP

(this also explains the PHP DOM parser)

For one or the other reason, and be it that you want to determine the home country of your visitor for localisation and language options, you might find yourself looking at integrating an IP lookup through an external API.

I suppose they all work very similar, but I have just integrated my shopping cart with the API from IPInfoDB.com. How it works is explained below…

A word up-front, though: When using third party APIs – think! Do you really need to hit the API with every page request? Especially in this case, would it not be fair to assume that the whole sessions would be coming from the same IP and therefore the same country? To an extend, could you not assume that it is one user you are tracking here and that he would probably come back to your site from within the same country, even though his IP might have changed? Could you therefore store the result from the API in a browser session or in a cookie?
– I actually do store it in the DB per cookie, but that’s not important for this little tutorial.

First up, you will need to have access to the API, so you need an API key, token-code or something to identify yourself with the API. On the IPInfoDB.com site you can register and receive your free key within seconds.

Got the key? – off we go then: Thankfully this is a pretty simple API that doesn’t use SOAP, but requires a simple HTML request and returns a nicely formatted XML. Here is a result:

<?xml version=”1.0″ encoding=”UTF-8″?>
<Response>
<Status>OK</Status>
<CountryCode>GB</CountryCode>
<CountryName>United Kingdom</CountryName>
<RegionCode>P9</RegionCode>
<RegionName>Windsor and Maidenhead</RegionName>
<City>Hillingdon</City>
<ZipPostalCode></ZipPostalCode>
<Latitude>51.5167</Latitude>
<Longitude>-0.45</Longitude>
<Gmtoffset>0</Gmtoffset>
<Dstoffset>0</Dstoffset>
<TimezoneName></TimezoneName>
<Isdst></Isdst>
<Ip>217.42.247.86</Ip>
</Response>

So far so good… Let’s create a corresponding PHP class that will make the usage easy portable to different projects.

  1. I create a class and bunch of variables and add getter methods to the class, so I can return the variables when I need them:

    class geoIP {

    var $apiKey = “XXXXYOURKEYHEREXXXX”;
    var $city;
    var $country;

    function getCity() {
    return $this -> city;

  2. Now I know that API key will be available when I initialise the object. Moving on to making a call…
    It’s quite easy in this instance, because we don’t need to set SOAP headers or anything. It’s a simple API and all information we need to give IPInfoDB can be parsed into the request URL. Here is how it looks:

    http://api.ipinfodb.com/v2/ip_query.php?key=YOURKEY&ip=IPTOCHECK&timezone=false

    So I create a method, let’s say, “makeCityCall” that I can then send the IP to check to:

    function makeCityCall($ip) {

    $urler = ‘http://api.ipinfodb.com/v2/ip_query.php?key=’. $this -> apiKey .’&ip=’. $ip .’&timezone=false’;

    The “$this -> apiKey” will return the API key that we declared and initialised as a global variable for this class. The “$ip” is what I send to the method.

  3. I know when I load this URL, I get an XML response. XML is best parsed via a DOM-parser. The DOM parser comes standard with most versions of PHP and is an object in it’s own rights. We have to instantiate this and can then give it the URL we declared ($urler) to load:

    $parser = new DOMDocument();
    $parser  -> load($urler);

  4. As we saw by the result returned above, the interesting bit is wrapped in a XML node called Response. We only get one, of course, but I will still ask the DOM parser to repeat the process of getting the values from all nodes that it finds:

    $nodes = $parser -> getElementsByTagName(“Response”);
    foreach ($nodes as $node) {

    I now want to get the values of the nodes contained within the Response node:

    $cc  = $node -> getElementsByTagName(‘CountryCode’);
    $cc =  $cc -> item(0)->nodeValue;
    $this -> countryCode = $cc;

    $cty = $node -> getElementsByTagName(‘City’);
    $cty = $cty -> item(0)->nodeValue;
    $this -> city = $cty;

    $ctry = $node -> getElementsByTagName(‘CountryName’);
    $ctry = $ctry -> item(0) -> nodeValue;
    $this -> country = $ctry;

    Thus setting the variables that I later want to retrieve via the getter methods.

  5. Lastly, if I now want to make a call from a PHP application, I simply need to instantiate the new class, get the IP address from the site visitor (or from wherever) and use the method to make a request. I can then retrieve the results from the getter-methods:

    $ip = $_SERVER[‘REMOTE_ADDR’];
    include (‘PATHTOPHPFILE/geoIP.php’);
    $gIP = new geoIP();
    $countCall = $gIP -> makeCityCall($ip);

    I can then write this out onto the page or re-use it as I wish:

    echo $gIP -> getCountry() . ‘<br />’;
    echo $gIP -> getCity() . ‘<br />’;
    echo $gIP -> getCountryCode() . ‘<br />’;

I hope this gets you further…
Java Swing GUI builder for Eclipse

I often struggle to make Swing applications to look good, or even make them vaguely look like I intended. The different JFrame layout options and all the coordinates of where to place what and how long is that makes the creation of Swing interfaces difficult.

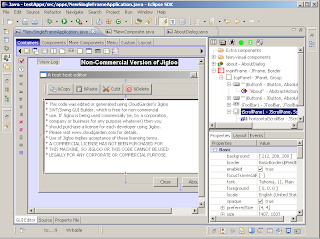
Since I don’t like using different development environments and got very used to Eclipse for anything I need to do, I was looking for a good graphical GUI builder that works as a plugin for Eclipse. I came across this really nice one: Jigloo from CloudGarden.

It’s pretty easy to install into Eclipse, via update site: http://cloudgarden1.com/update-site and then creates GUIs by drag and drop in a way that I thought wouldn’t have been possible. The commercial use of this product is prohibited without license, but this shouldn’t stop any hobby programmer, much like myself, from using this great product.

Here is a screenshot I leeched off their site (I might attach one or two myself):

Enjoy

Bear?

From: d3ngar
To: bear
Subject: Bear

Message:
Wow, Bear!

What a nick – what a movie…

You might not know this, Bear, but there is a movie with the same name, Bear, that came out last year. You might have guessed: it features a bear, named Bear…

You might wanna check out Bear, the movie, it’s really great : http://www.imdb.com/title/tt1468703/

Best Regards,

d3ngar
d3ngar.blogspot.com

BadgerComp / Cart & Opilion

Anyhow, so I decided to start using the Java code from Opilion for crawling tasks for BadgerComp.com.
I probably will continue building on the image getter first. I’m thinking that you will want to upload them straight somewhere. Probably via FTP. Or you could download them to your local hard disk first.

I’ll probably make the tool available via the BadgerCart Wiki, but it might be getting annoying to enter the user details all the time. Maybe I need to be able to load settings via XML?

Transdroid – Add torrent files to your home PC from anywhere

I do use my home computer for various things while I’m out. The more important ones features for me are SSH / SFTP and Subsonic, but I also keep Transmission, the default ubuntu bitTorrent client, running throughout the day.

So it does happen, that files are being uploaded or downloaded, while I would like to use the available bandwidth otherwise.
Along comes Transdroid
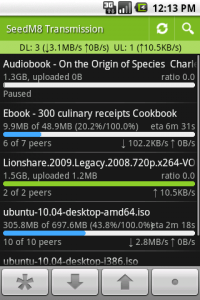
With transdroid you can control your torrent client remotely, set download limits, delete or pause and resume torrent down and uploads.
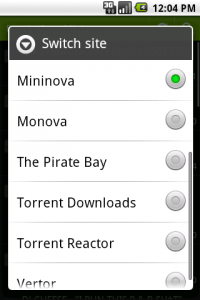
But it does one important other thing: it allows you to find and add torrent files. Search for some (if not all) the popular torrent search engines is already build in. All you need to do is select it.
If you are often away from your computer when you remember that you should actually be downloading something, or restrict downloading of a torrent, then this Android app will be of great valuable to you. Here is the QR code to download Transdroid from the Android market it right away:

Feng Office – Team Collaboration & Project Management software

Feng Office is the successor of a software called OpenGoo and probably one of the best pieces of free, open source software that I have come accross. It’s really on par with MediaWiki and has become a real asset in the development of my site.

It combines a powerful project management and tracking system with a collaboration hub.

Using workspaces, you can conveniently manage multiple projects at the same time and handle resources accross the different projects. User rights prevent people from accessing locations that they are not meant to see.

Through a bit of customisation, you can set it up to not only track changes to all your online files, but also see who is working on which file at the moment. While someone is working on a file, and be this a PHP file or a letter to a supplier, it is marked as ‘checked out’. This prevents two people modifying the file at the same time, thus eliminating one parties work…

It also has features for Notes, email, contacts and a calendar. It’s a truly amazing piece of software and deserves the support fo the community…

MySQL problems: Starting MySQL. ERROR! Manager of pid-file quit without updating file.

I stumbled across this error when I tried to import an InnoDB backup into my existing MySQL server.
I have one application that collects data that I need to tie to another set of data that is recorded on a different server through a different application.
It’s been rather challenging, cause I had to work of an InnoDB backup and they aren’t easily imported to another MySQL server, especially if you want to keep the data on that other server.

Okay, so what I tried, and ultimately prevented me from restarting MySQL was:

  1. changing all tables on the MySQL server to MyISAM
  2. killing MySQL (yes, I couldn’t stop it)
  3. copying the files in the MySQL DataDir to a backup location
  4. Copying the InnoDB backup files that I want to import into my DataDir
  5. trying to restart MySQL
But this is were the trouble started. The files couldn’t be imported and I had to roll back and use my backup files. But:

# sudo /etc/init.d/mysql start
Starting MySQL. ERROR! Manager of pid-file quit without updating file.

So I deleted the pointer file in /var/lock/subsys/

# sudo rm -f /var/lock/subsys/mysql
# sudo /etc/init.d/mysql start
Starting MySQL. ERROR! Manager of pid-file quit without updating file.

This didn’t work…
After long fiddling, I found out that the files in my DataDir have changed it’s owner, since I copied them as root to the backup location and back. They were now owned by root. So after:

# sudo chown mysql:mysql *
# sudo chgrp mysql *

I could do:

# sudo /etc/init.d/mysql start
 Starting MySQL. SUCCESS!

Hope this helps you too!

Connecting your MySQL data with MS Excel

Excel is still the most popular product when it comes to working with spreadsheets or analysing data. I often analyse large spreadsheets with data I got from a database. 

While it’s not too much effort to copy the data into the spreadsheet when you do need something ad hoc, it can be quite frustrating if you are preparing the same reports over and over again. It would be much easier to just integrate the query as a data source in Excel.
Excel has already got great features to tie into MSSQL, probably because they want to sell more of their own stuff, but I suppose it should be just as easy connecting it with MySQL…
  1. We will need a driver:
    MySQL provides a lot of connector files on their website, it’s pretty easy to navigate and find what you are looking for, but, just  in case, here is the link to the ODBC files I will be using for an Windows XP conncetion: http://dev.mysql.com/downloads/connector/odbc/#downloads
  2. We will need the data source as a ODBC connection in Windoze:
    Go Start > Control Panel > Administrative Tools > Data Sources (ODBC) > Add…
    and find the newly installed MySQL driver. Then it will ask you to enter your details and you should be half way there already…
  3. It’s already time to use Excel:
    so start Excel… There are now different ways of getting data into Excel. I want to use my own query, so I’m going to use the ‘From Microsoft Query’, as it recognises the existing ODBC connection we established.

    Then I’m going to connect to the ‘localhost’ connection I previously created:

    To get further, I need to select at least one field from the database. It doesn’t matter if it’s a relevant field, because a query tool will appear at the end of the dialogue.

    It comes in form of a question, and you select the lower radio button:

    Finally, you can add your own query (SQL button).
    And the result:

It will take a while when you enter your own query, very much depended on how complex your query is, but I hope for you it takes under five minutes to run 😀
Let me know if that works for you or if you have any breaking points. 

Installing Office 2007 on Ubuntu

This evening I thought I finally give installing Office 2007 another go. Not that I don’t like OpenOffice, but I often deal with files that have more than 65k lines…

I am no fan of Microsoft, but I must admit that the Office suite was always great. Probably that’s why it’s the only non native software that’s made it to the Mac…
I also got quite used to using the ribbon and it’s visually very pretty to work with MS.

So, I read that you should use an older wine version, namely 1.1.14, but I also read on the wine site that everything above 1.1.3 should also be suitable, so I will get the latest wine version Synaptic can find (which is 1.1.38). I will also install wine-gecko and I know we will need cabextract… The package manager thinks it’s wise to install a few other packages to, so here we go!

Good news: so far so good..
it starts the installation and asks for product key…
off to choose the programmes…
and the installation proceeds… (the installation is anything but quick…)

For the next step we need winetricks:
Get it by:

sudo wget www.kegel.com/wine/winetricks

So now we should be able to install a few windows repositories:

sh winetricks corefonts tahoma vcrun2005sp1 wsh56js

This will ask you a few time if it’s OK to install certain things and once completed, you need to configure wine:

winecfg

Find the libaries tab and add to new overrides:
riched20 & usp10
both will need the ‘Native (Windows)’ button ticked.

And off we go!
It installed in fine and it runs fine. Here is a screenshot: