Blog

Switching off the Synaptic touchpad in Linux

If you are anything like me, you will find it annoying that your hand sometimes brushes against the touchpad of your laptop and – bang – the mouse has moved, the courser is misplaced and you have to correct what you have just written on…

Normally switching off the touchpad on laptops is easy, there will be a hotkey, but in Linux you will find not all ACPI options are working well and properly – or at all.

But it can be quite simple switching the touchpad on and off.

We need one step of preperation:

Open your xorg.conf as root (in my distro):
# sudo gedit /etc/X11/xorg.conf

Somewhere there should be this section:

Section “InputDevice”
Identifier “Synaptics Touchpad”
Driver “synaptics”
Option “SendCoreEvents” “true”
Option “Device” “/dev/psaux”
Option “Protocol” “auto-dev”
Option “HorizEdgeScroll” “0”
Option “SHMConfig” “on”
EndSection

It is important that you have this in there:
Option “SHMConfig” “on”

If that’s done, save and exit.

Next you will need to restart your graphic interface (so xorg.conf get’s loaded again). Simply press CTRL + ALT + BACKSPACE

Great, that’s done – now you can do this (as root):
# synclient touchpadoff=1
to switch it off, and:
# synclient touchpadoff=0
to switch it back on…
Kingdom Of Fear

An interesting article I saw in the morning paper, cited that the former head of MI5 warns that British Labour (the party) is using fear of terrorism to restrict our civil liberties and invade our privacy.

I found an article on BBC about here: http://news.bbc.co.uk/1/hi/uk/7893890.stm

‘The Home Office said it was vital to strike a right balance between privacy, protection and sharing personal data.’

The truth is, in the eyes of the state, the right balance is no privacy for the individual. This is something I’ve learned to accept and it’s quite understandable that people won’t start a revolution over what is essentially put into place to protect them.

Nonetheless, I think I will use the opportunity of posting a few tutorials about staying save and ‘private’ on the internet. Afterall, why would I want the government to read and record my emails? I don’t know what they could spin me out of whatever, but my secrets should stay mine. I feel more comfortable this way.

How to change the mouse polling rate in Ubuntu

Changing the mouse polling?

Special Thanks to: Cesare Tirabassi and everyone contributing in this thread

Beginner Tip: You must use sudo when editing these files.
Such as:

Code:
 gksudo gedit /etc/modules

Blackmagic’s solution:
Edit /etc/modules

Code:
gksudo gedit /etc/modules

Add these two lines onto the end:

Code:
-r usbhid
usbhid mousepoll=2

reboot.

Alternate solution that may work on Feisty (try the first one first):
Add

Code:
options usbhid mousepoll=2

on its own line at the end of /etc/modprobe.d/options

and then add

Code:
usbhid

on the end of /etc/modules
reboot

Alternate solution that may work on Edgy:
Add

Code:
options usbhid mousepoll=2

to /etc/modprobe.d/usbhid

and then add

Code:
usbhid

on its own line at the end of /etc/modules
reboot

aidanr’s alternate feisty solution
Create a file at /usr/local/bin/mymousesettings with the following inside:

Code:
#!/bin/bash
rmmod usbhid && modprobe usbhid mousepoll=2

or if you want to use lomoco (a program for changing the resolution on Logitech mice) you can use this instead:
(G5 and G7 mice don’t need lomoco because they are software-independant)
{
Install:

Code:
sudo apt-get install lomoco

lomoco’s Homepage: http://lomoco.linux-gamers.net/

Code:
#!/bin/bash
# -4 for 400 cpi, -8 for 800 cpi, -m for 1200 cpi, -h for 1600 cpi, -g for 2000 cpi
lomoco -h && rmmod usbhid && modprobe usbhid mousepoll=2

}

After doing either method enter the command

Code:
sudo visudo

and replace the line that says

Code:
%admin ALL=(ALL) ALL

with

Code:
%admin ALL=(ALL) ALL, NOPASSWD:/usr/local/bin/mymousesettings

Use Control + O and then hit enter to save and then use Control + X to exit.

Add that command to startup in System –> Preferences –> Sessions by clicking add and then adding

Code:
sudo sh /usr/local/bin/mymousesettings

as a new entry.
reboot

hanging the mouse polling?


Fixed it with the help of the Gentoo guide:
http://gentoo-wiki.com/TIP_Change_mouse_hz

I added

Code:
options usbhid mousepoll=2

to /etc/modprobe.d/usbhid
(using “sudo nano”)

and then I added

Code:
usbhid

on the end of /etc/modules

=)

Code:
$ cat /sys/module/usbhid/parameters/mousepoll
2


Here are all the mouse polls:

1 = 1000Hz
2 = 500Hz
4 = 250Hz
8 = 125Hz
10 = 100Hz (Default)

OpenArena – the pure fun of playing Quake 3

As a Linux lover, I’m always happy to find games that are a) free and b) cross-platform (that means my non-linux friends can also play with me…

The latest of such games is OpenArena, a 3D First Person Shooter based on the now openly available source code ID Tech 3 (which was Quake 3, lots of COD parts and many more). Aparently the creator of OpenArena took the liverty of also smoothing out some of the bugs of Q3 and the result is an unbelievably rocking experience.

But not enough: the existing mods for Quake 3 (baseq3, OSP, CPMA, …) are working on it too!

Because it’s free it’s still very much played online, I saw a lot of servers and will probably try to get my own dedicated server up in a few days…
The address will be posted here.

For all of you looking for a good online shooter, I can very much recommend OpenArena:
http://openarena.ws/

Microsoft Employees Forced Into Op To Make More Evil

Yes, the rumors have been around for quite some time. Since 1998, to be precise. A friend of mine, Dick Scratchy, has recently quit working for the corporation ‘that want’s to dominate the world by eliminating any other operating system’, [sic].

Dick told me how, after successful interviews, he was invited to a private surgery to turn him into a ‘Microsoft Compatible Employee (TM). Little did he know, he received a full anesthetic upon arrival and what happened to his body was blanked from his memory – only traces of the terrible experience remain with him.

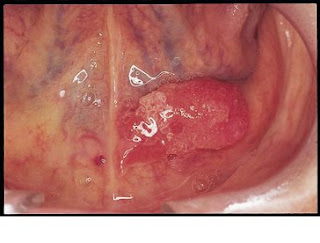
Apparently, Microsoft Doctor (TM) removed the sublingual gland from his mouth and replaced it with a venom gland of a king cobra (see picture).

King Cobra poison gland in human mouthMicrosoft, so he Dick tells me, altered his body and installed the poisonous gland to ‘deter enemies of the company and allow their employees to spit blinding poison in the faces of users of other operating systems or also people who are generally unhappy with Microsoft or any of it’s products.’

Poor Dick had a lot of problems with his girlfriend because of the new gland, the two eventually split up.

This clearly illustrates what we all suspected: Microsoft wants to dominate the world. They don’t care about you – the user. User friendliness is an illusion that only used to capture audiences initially. Now, as other operating systems clearly bring better value to the user, they use anything in their power – that includes their vast arsenal of employee resources around the world – to fight their competitors.

Be careful, never trust Microsoft and if anyone near you identifies themselves as an employee of said company – destroy their jaw! It’s where the poisonous gland sits!

Some god be with us!

Office 2007 Installer – The windows installer service cannot update one or more protected windows files.

FIX: Office 2007 Installer – The windows installer service cannot update one or more protected windows files.

I came across an interesting dilema just now trying to install Office 2007.

Before actually starting to install the product the setup stalled with:

The windows installer service cannot update one or more protected windows files.

I was a little stunned, this is clean installed box. So I checked the Event Viewer:

Product: Microsoft Software Update for Web Folders  (English) 12 -- Error 1933.

The Windows Installer service cannot update one or more protected Windows files. SFP Error: -536870654.

List of protected files:rnc:program filescommon filesmicrosoft sharedweb server extensions40binfp4autl.dll

Ah ok, this is a customised installation of windows (I’ll post how this happend later) and its looking for the frontpage extensions which (in this install) doesnt exist. So how to fix? Simple, download a copy of the missing file from DllDump, place it into the c:program filescommon filesmicrosoft sharedweb server extensions40bin folder and retry installation!

Fix the upside down on uvc webcams

Hi everybody,
it’s a very quick how-to that will help you to solve the problem of those webcams who give back upside-down images/videos!!!
This help is intended only for those who have a UVC capable webcam.
But it will be usefull only if your webcam supports YUV image format and the applications that use your webcam request YUV format to your webcam!!! I’ve tested it and it works with:
skype, amsn, kopete, luvcview, mplayer!!

So…let’s start!!!!

In order to know if your webcam is UVC capable you just need to open your shell and run:

Code:
lsusb


you will get something like this:

Quote:
Bus 002 Device 001: ID 0000:0000
Bus 001 Device 002: ID xxxx:yyyy “Your_Webcam_Model”
Bus 001 Device 001: ID 0000:0000

Then type:

Code:
sudo lsusb -d xxxx:yyyy -v | grep "14 Video"


If you get something like the following, your webcam is UVC capable:

Quote:
bFunctionClass 14 Video
bInterfaceClass 14 Video


If your webcam passes this test, you can go on reading. Otherwise, your camera needs to use propertary driver, because it doesn’t use standard protocol/command.

Well,
now you need to donwload the UVCVIDEO driver sources, but they are on a SVN repository, so you need to install the SVN client:

Code:
sudo apt-get install subversion

and now you can download the sources:

Code:
svn checkout svn://svn.berlios.de/linux-uvc/linux-uvc/trunk


The sources will be saved into a folder called “Trunk” in the path from where you run the previous command.

Next, you need to use a patch to update your clean uvcvideo driver. Please download this.

Then proceed..

Code:
patch < patch_solution1_mirrored.patch

Well, now the worst part has been done!!!
We just need to compile our modded file and to install the new driver, so from shell you have to go to the "Trunk" directory and type:

Code:
make

there shouldn't be errors!!

Then, ONLY if you are using one of the Ubuntu distributions (ubuntu, kubuntu, etc.), open with you editor the "Makefile" and change the following line:

Code:
INSTALL_MOD_DIR := usb/media

with

Code:
INSTALL_MOD_DIR := ubuntu/media/usbvideo

Now we just need to remove uvcvideo module (if you have previously installed it):

Code:
sudo modprobe -r uvcvideo

Then:

Code:
sudo make install
sudo modprobe uvcvideo

Now everything should work!!!

Let me know!!

Fix ‘Hardware error’ for Adobe CS2 running over wine

PERMANENT FIX: The permanent fix is actually very simple. The problematic file is the General Settings file, “Adobe Photoshop CS2 Prefs.psp”, which references the default fonts Adobe expects to be installed. If for any reason these fonts, or any other files, are not installed or not functioning as expected, the application will terminate to the desktop. This settings file is located here:

In Wine:

/home/[USER PROFILE]/.wine/drive_c/windows/profiles/[USER PROFILE]/Application Data/Adobe/Photoshop/9.0/Adobe Photoshop CS2 Settings/Adobe Photoshop CS2 Prefs.psp

In Crossover Office:

/home/[USER PROFILE]/.cxoffice/[CS2 INSTALLATION BOTTLE NAME]/drive_c/windows/profiles/crossover/Application Data/Adobe/Photoshop/9.0/Adobe Photoshop CS2 Settings/Adobe Photoshop CS2 Prefs.psp

Naturally, replace [USER PROFILE] with the user name you are working under, and replace the CS2 INSTALLATION BOTTLE NAME with whatever you named the bottle you installed Photoshop CS2 under in Crossover.

Now, if you’ve encountered this error, you’ve already run CS2 twice, and the settings file has already been created and corrupted. Although deleting it will allow you to start CS2, it will again store a corrupted file when you exit the application, and next time you start the application, you’ll repeat the same fatal error as usual.

So, having located this file, perform the following steps:

(1) Rename or delete the corrupted file
(2) Start CS2. It should start just fine.
(3) IMMEDIATELY after it has started, change the permissions on the newly re-created settings file (Adobe Photoshop CS2 Prefs.psp) to READ ONLY. You can do this in your file browser, or, if you are at the command line, use the following command:

chmod -w ./Adobe Photoshop CS2 Prefs.psp

Logitech VX Revolution

I struggled for a long time to use the ‘back’ and forward button on my mouse in some applications. Especially the open source apps seemed to not recognise the button 4 and 5.
I tried assigning key macros, so that I maybe be able to use simple copy paste actions, but this didn’t work either.

I finally found the solution: Simply switch of the SetPoint software that launches with windows start. Started working like a charm right away…

A new post!

After month of quiteness… A new post.

As always, I’m rather busy at work, I have a new laptop after my old one was stolen and I have experimented around with different operating systems.

Computer-wise I’m now running an ubuntu system and I have to say that I’m quite pleasantly surprised… Apart from my sound-card, the hardware is sorted. I can’t very well use USB devices in Windows which is annoying, but I think I can live with that for the moment.

I’ll be working on the design of the blog in the weeks. And I will see what else I got time for. I see if I can blog some more, maybe add different themes